Ensure Your Collectors are Configured for HTTPS
Configure the Collector to Utilise an Identity Provider for User Management
Configure the Collector to Utilise an Identity Provider for Secure Data Access to Historians
Keep Your Secret Safe Using Environmental Variables
Ensure Your Collectors is configured for https
In order to utilise user management and a secure data connection, Collectors must be configured to utilize https communication and be bound to a certificate.
See the example below on a sample settings.config file to enable https on Collectors:
Default location for the settings.config file on Windows environments are:
C:\ProgramData\Flow Software\Timebase\Collector\Settings
Make sure that your configured url endpoints are not using the same port. By default, the http endpoint is binding to port 4521 and https to port 4522
"Kestrel": {
    "Endpoints": {
      "Http": {
        "Url": "http://<YourIPAdressHere>:4521"
      },
       "Https": {
        "Url": "https://<YourIPAdressHere>:4522",
        "Certificate": {
          "Subject": "localhost",
          "Store": "Root",
          "Location": "CurrentUser",
          "AllowInvalid": "true"
      }
    }
  }
  }
What are the possible values for the different certificate properties you may ask?
Location is either CurrentUser or LocalMachine
Your Store Name is either AddressBook, AuthRoot, CertificateAuthority, Disallowed, My, Root, TrustedPeople, or TrustedPublisher
Subject refers to the value of the "Subject" field in your certificate
AllowInvalid where the value is set to true if the validity check for the certificate should by bypassed/ignored. Set to false if only valid certificates are permitted.
Create a Client in Pulse
By Default, Pulse will have created clients to use for all Timebase modules. These clients's Client Id and Client Secrets can be used to configure the different modules Idp settings.
It is assumed by this point that Pulse is installed, configured to use https and bound to your certificate and active.
Create a Client via the Pulse UI by navigating to the https address of your Pulse service.
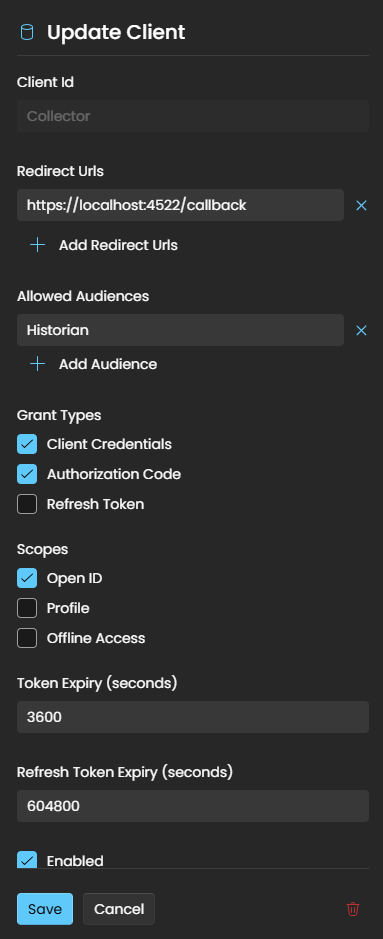
Client should have the following minimum config configured:
Client Id - Unique Client Identifier
Redirect URL - redirect to the Log in dialog after successful authorization. For the Collector this value will be: https://<YourCollectorIpAdress>:4522/callback
Allowed Audiences - add the Client Id to the Historian this Collector need to have a secure data connection. If this Collector is pushing data to multiple Historian nodes, all historian client Id's must be added to the Allowed Audiences list
Grant Types - Authorization Code and Client Credentials
Scopes - Open ID
Once done configuring the client, select save. Select your newly created client to gain access to your Client Id and Client Secret. You need both of these for the next step.
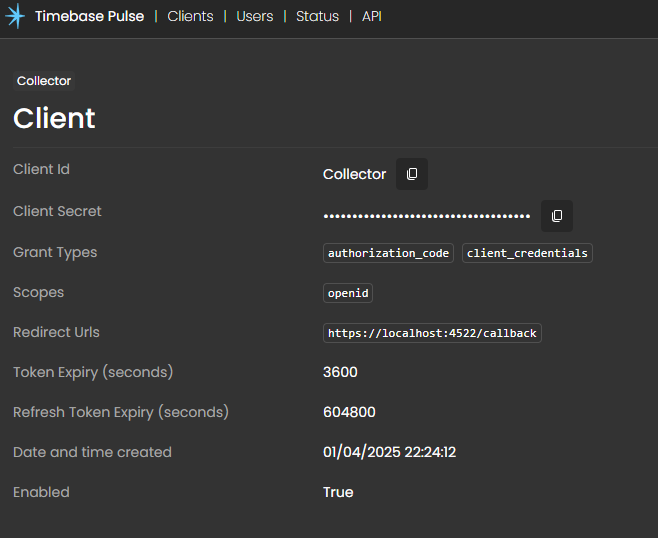
You can copy/paste your Id and client secret from the client details page to configure your Historian's identity provider settings.
Configure Collectors to Utilise an Identity Provider for User Management
In order for Collectors to authenticate against Pulse (for user management) using the new Client you configured; you need to edit the Collector settings file to include your new authentication settings. See an example below:
"Auth": {
    "Enabled": true,
    "IdP": {
        "Host": "<yourPulseIPAdressHere>",
        "Port": 4542,
        "UseTls": true
    },
    "ClientId": "<yourClientIDHere>",
    "ClientSecret": "<yourSecretHere>"
  }
You will use your copied Client Id and Client Secret to configure your historian Idp settings.
Configure Collectors to Utilise an Identity Provider for a Secure Connection to Historians
In order for Collectors to authenticate against Pulse (for secure data connections) using the new Client you configured; you need to edit the Collector historians file to include your new authentication settings. See an example below:
{
  "Historians": {
    "Local": {
      "Host": "localhost",
      "Port": 4511,
      "UseTls": true,
      "Auth": {
        "Enabled": true,
        "IdP": {
          "Host": "<YourPulseIpAdress>",
          "Port": 4542,
          "UseTls": true
        },
        "ClientId": "<YourClientId>",
        "ClientSecret": "<YourClientSecret>"
        }
    }
  }
}
You will use your copied Client Id and Client Secret to configure your Collector Idp settings.
Keep your secret save using Environmental variables
Potentially, having your secret in plain text can be a security violation and best practises would be to use environment variables to store your secret.
Environmental variables can be referenced in your setting file:
"Auth": {
    "Enabled": true,
    "IdP": {
        "Host": "<yourPulseIPAdressHere>",
        "Port": 4542,
        "UseTls": true
    },
    "ClientId": "<yourClientIDHere>",
    "ClientSecret": "%MyClientSecrectEnv%"
  }
For Windows based systems, an environmental variable placeholder is denoted by %%, while in Linux / Mac it is denoted by ${} e.g %MyClientSecrectEnv% n Windows and ${MyClientSecrectEnv} in Linux / Mac
Log into the Collector UI
Navigate to your Collector's https address and if successful, you should be presented with a Login dialog to securely access your Collector Config