Timebase can be natively integrated with Ignition (v8.3.1+) by serving as both a Storage Provider as well as a Tag History Provider.
Installation
- Download the FREE Timebase Historian Ignition Module from Inductive Automation's Third-Party Module Showcase)
- Install the module on your Ignition Gateway
- From the Ignition Gateway's left side menu, select 'Platform', then 'Modules'.
- Use the 'Install or Upgrade Module +' button in the upper right hand corner.
- Restarting your Ignition Gateway is required by Inductive Automation for any module to be installed or removed.
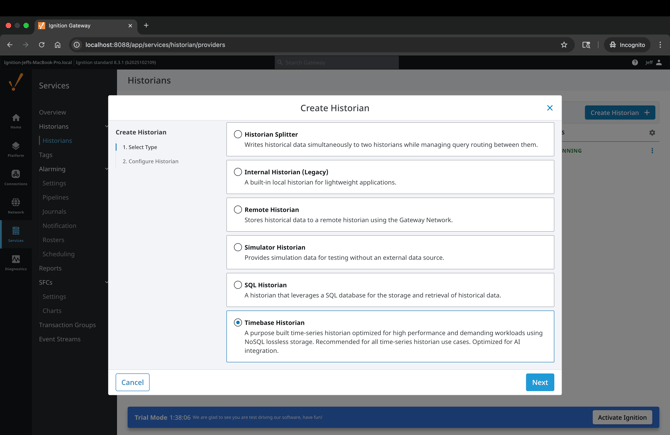
CREATE THE HISTORIAN INSTANCE
- From the Ignition Gateway, select 'Services' from the left-hand menu, then select 'Historians' from the Overview section.
- Select the 'Create Historian +' button from the upper right hand corner.
- If you successfully installed the Timebase module and restarted your gateway during the Installation steps, 'Timebase Historian' should now be at the bottom of the list of available Storage Providers. Select it and click 'Next'.
Configure the Historian
This single configuration point establishes Timebase Historian as both an Ignition Storage Provider as well as an Ignition Tag History Provider.
Datasets are automatically created within the Timebase Historian, each named for your existing Ignition Tag Providers and the tags within those providers are logged to the corresponding data set once history is enabed for the tag within your project.
You have the option to prefix these datasets, maintaining unique dataset names when historizing data from multiple Ignition Gateways with the same Tag Provider names.
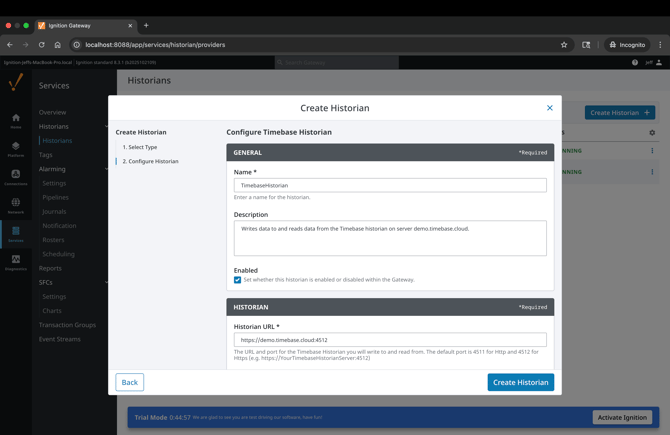
Minimal configuration is required, primarily the URL for the location of your Timebase Historian, and if you choose to use security, the appropriate Pulse URL and credentials. Configure the following fields to complete your configuration (required fields are noted with an asterisk):
| Name: | (required) A unique name for this historian instance, will be used in projects to reference where to historize your data to as well as where to read data from. |
| Description: | Provide a description for the historian instance. |
| Enabled: | Sets whether the historian is enabled or disabled. |
| Historian URL: |
(required) The URL and port for the Timebase Historian you will write to and read from. The default port is 4511 for http and 4512 for https. Include the port after the address, example: https://YourTimebaseHistorianServer:4512 Note: Please ensure to add you URL scheme (http:// or https://) to the front of your URL |
| Historian Data Prefix: |
Datasets are automatically created within the Timebase Historian, each named for your existing Ignition Tag Providers, and the tags within those providers are logged to the corresponding data set once history is enabled for the tag within your project. For example, tags with history enabled in the [default] Tag Provider, will be stored in a Timebase Historian dataset called default. You have the option to prefix these datasets, maintaining unique dataset names when historizing data from multiple Ignition Gateways with the same Tag Provider names. For example, a prefix of Gateway-042- and a Tag Provider of [default] would result in a dataset named Gateway-042-default. Timebase Historian datasets allow alphanumeric characters, spaces, hyphens, and underscores. Please avoid any other special characters. |
| Pulse URL: |
Entering the URL and port for the Timebase Pulse you will write to and read from will enable this feature. Timebase Pulse is the identity provider for client tools and applications to interact with Timebase components. The default port is 4542. Include the port after the address, for example: https://YourTimebasePulseServer:4542 |
| Pulse Client ID: |
The Client ID you have already created within Timebase Pulse to be used for authentication by Ignition (e.g. Ignition). To learn more about how to setup Pulse or configure a Client ID, see the Pulse knowledge base. |
| Pulse Client Secret: |
Copy and paste the unique secret for the Pulse Client ID here. |
HISTORIZING DATA
Open your Ignition project and select the tags you wish to historize. Once enabling history you should be able to select the Timebase Storage Provider.
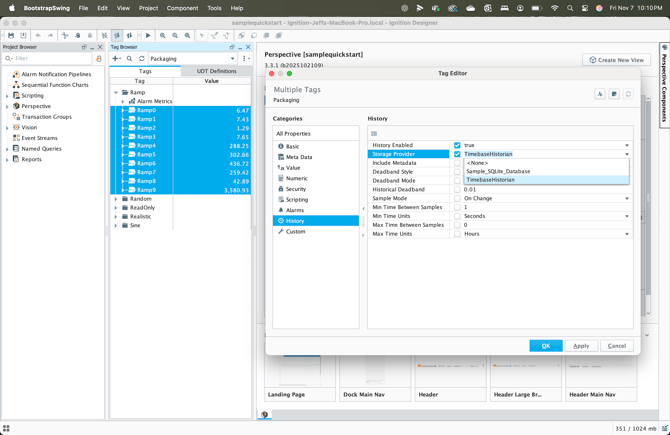
The settings you configure within the 'History' category for deadbands, sample modes, and min/max time between samples will be applied by Ignition prior to the data being logged to your Timebase Historian.
READING DATA
Within your Perspective or Vision project you can recall data by binding Timebase Historian tags to various components. All data is retrieved in original raw format.
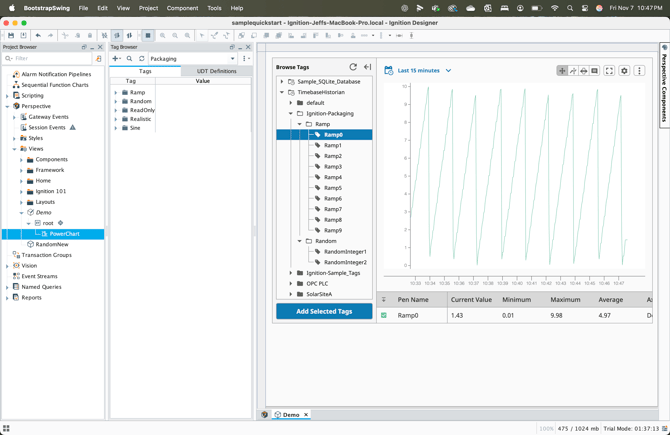
When retrieving data via the system.historian.* functions, please ensure to use the fully qualified historical ignition tagpath i.e.
histprov:Timebase:/drv:default:default:/tag:default/Overview/CaseCount